caio can be launched from a filesystem navigator or from a command line terminal.
When caio is installed in the system its icon should be visible from any filesystem navigator. When launched, a configurator GUI appears:

The upper left corner contains buttons Add, Rename, Delete, and Run,
these are used to add, rename, delete, and run machine configurations
respectively.
The left pane below the buttons contains a selectable a list of machines and the right pane shows the specific configuration values for the selected entry.
The upper right corner of the main window contains buttons to change from Dark mode to Light mode and vice versa, and buttons to increase/decrease the font size which can also be changed using CTRL + and CTRL - (under macOS it would be command ⌘ + and command ⌘ -).
User defined configurations are stored in the $HOME/.config/caio/ directory.
Note that this directory is not removed when caio is uninstalled from the
system.
$ caio help
usage: caio <arch> [--help]
where arch is one of:
c64
nes
zx80
zxspectrum
Generic Configuration
Configuration parameters can be specified as command line options or as
key-value pairs in a configuration file.
The configuration file contains two types of sections: One generic
section whose values are inherited by all platforms, and one specific
section for each emulated platform.
If a parameter is specified twice (as platform specific and generic), the
platform specific value takes the precedence.
The configuration file is searched in the following places (stop at first match):
- Command line option:
--conf - User's configuration directory:
$HOME/.config/caio/caio.conf - System's configuration directory:
$PREFIX/etc/caio/caio.conf
Command line options take precedence over those defined in the configuration file.
Generic options as command line parameters:
 --conf <cfile>          Configuration file
 --romdir <romdir>       ROMs directory (default is /opt/caio/share/caio/roms)
 --screenshotdir <sdir>  Screenshot directory (default is ~/Desktop)
 --snapshotdir <sdir>    Snapshot directory (default is ~/.config/caio/snapshots)
 --palettedir <pdir>     Colour palette directory (default is /opt/caio/share/caio/palette)
 --palette <palette>     Colour palette name or filename
 --keymapsdir <kdir>     Key mappings directory (default is /opt/caio/share/caio/keymaps)
 --keymaps <keymaps>     Key mappings name or filename
 --cart <fname>          Cartridge filename
 --snap <fname>          Snapshot file
 --scale <scale>         Window scale factor (default is 1)
 --aspect <ratio>        Aspect ratio: 16:9, 8:7, 6:5, 5:3, 4:3, system
                         (default is system)
 --scanlines <n|h|v|H|V> Scanlines effect: (n)one, (h)orizontal, (v)ertical,
                         advanced (H)orizontal, advanced (V)ertical
                         (default is n)
 --fullscreen [yes|no]   Start in fullscreen mode
 --sresize [yes|no]      Smooth window resize (default is yes)
 --audio [yes|no]        Enable audio (default is yes)
 --delay <delay>         Clock delay factor (default is 1)
 --monitor [yes|no]      Activate the CPU monitor (default is no)
 --logfile <file>        Send log information to the specified destination
                         (default is /dev/null)
 --loglevel <lv>         Loglevel, bitwise combination of:
                         none|error|warn|info|debug|all (default is none)
 --keyboard [yes|no]     Enable keyboard at startup (default is yes)
 --vjoy [yes|no]         Enable virtual joystick (default is no)
 --vjoy-up <keyname>     Virtual joystick UP key (default is KEY_NUMPAD_5)
 --vjoy-down <keyname>   Virtual joystick DOWN key (default is KEY_NUMPAD_2)
 --vjoy-left <keyname>   Virtual joystick LEFT key (default is KEY_NUMPAD_1)
 --vjoy-right <keyname>  Virtual joystick RIGHT key (default is KEY_NUMPAD_3)
 --vjoy-fire <keyname>   Virtual joystick FIRE key (default is KEY_LEFT_ALT)
 --vjoy-a <keyname>      Virtual joystick A key
 --vjoy-b <keyname>      Virtual joystick B key
 --vjoy-x <keyname>      Virtual joystick X key
 --vjoy-y <keyname>      Virtual joystick Y key
 --vjoy-back <keyname>   Virtual joystick BACK key
 --vjoy-guide <keyname>  Virtual joystick GUIDE key
 --vjoy-start <keyname>  Virtual joystick START key
 --statusbar <pos>       Status bar position, one of:
                         none, center, north, south, east, west,
                         north-east, north-west, south-east, south-west
                         (default is "south")
 -v|--version            Show version information and exit
 -h|--help               Print this message and exit
The keyboard layout depends on the emulated platform at it is set using the
keymaps configuration option.
By default, keyboard mappings are stored in the $FREFIX/share/caio/keymaps/
directory in the form of text files. This directory can be changed using the
keymapsdir option.
The user can define new mappings by adding files into this directory.
When a gamepad is detected it is automatically connected to an emulated joystick port.
A virtual joystick is available and it can be enabled using the vjoy
configuration option. The default mappings are:
- Up:
KEY_NUMPAD_5 - Down:
KEY_NUMPAD_2 - Left:
KEY_NUMPAD_1 - Right:
KEY_NUMPAD_3 - Fire:
KEY_LEFT_ALT
These mappings can be changed using parameters: vjoy_up, vjoy_down,
vjoy_left, vjoy_right, and vjoy_fire.
When the virtual joystick is enabled it is automatically connected to the first emulated joystick port.
Commodore 64
$ caio c64 --help
usage: c64 <options> [<file>]
where <file> is the name of a program, cartridge or
snapshot to launch (the file format is auto-detected)
and <options> are:
 ...
Commodore C64 specific:
 --prg <prg>             Load a PRG file as soon as the basic is ready
 --swapj [yes|no]        Swap Joysticks (default is no)
 --unit8 <dir>           Attach a disk drive as unit 8
 --unit9 <dir>           Attach a disk drive as unit 9
The following keyboard layouts are available for the C64:
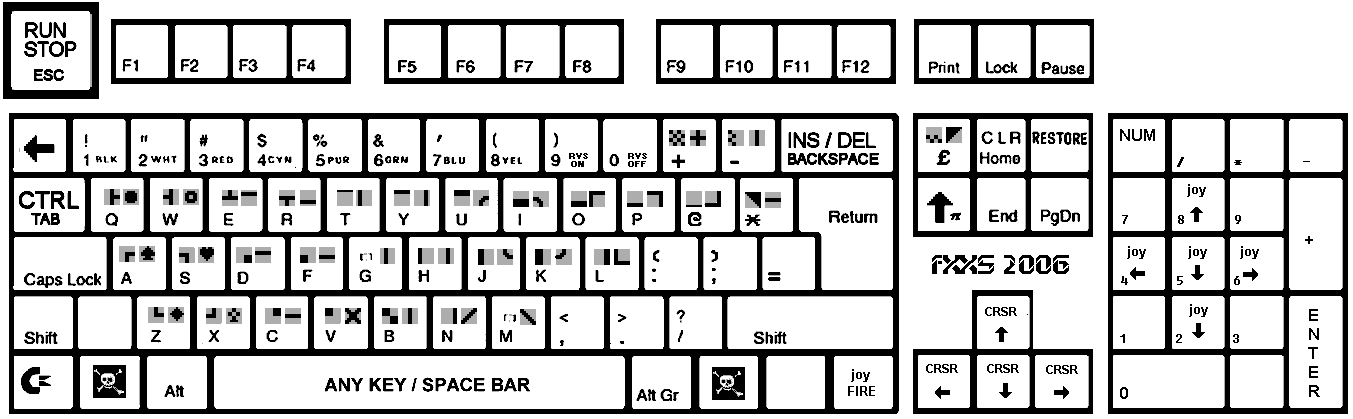
Like the VICE emulator, the RESTORE
key is mapped as Page-Up, RUN/STOP as ESC, CTRL as TAB and
CBM as LEFT-CTRL.
For example, to use the italian layout:
$ caio c64 --keymaps it
To use the vice positional layout:
$ caio c64 --keymaps vice
The Commodore 64 has two joystick ports. If a gamepad is detected it is connected to one of the available emulated joystick ports.
That is, if the virtual joystick is not enabled, the gamepad is connected
to the first C64 joystick port.
If the virtual joystick is enabled, it is connected to the first port and
the gamepad to the second port.
This default can be changed using the swapj option or the ALT-J key
combination.
Unexpected results could occur when the same key is shared by both the
emulated keyboard and the virtual joystick (both try to process the same
keystroke). To help deal with this situation the keyboard can be enabled
or disbled at runtime using the ALT-K key combination.
Games or other applications that use the keyboard in conjunction with the
virtual joystick should never share the same keys. If the default virtual
joystick keys are not available or they are difficult to use, the user can
redefine both, the keyboard keys and the virtual joystick keys as desired.
For more information refer to the Generic Configuration section.
There is an implementation of the
C1541 disk drive unit that
access the host filesystem. Host directories are recursively traversed so
it must be used with care.
Configuration options unit8 and unit9 can be used to associate a host
directory to a floppy disk.
D64 disk drive images are not supported (yet).
The following command activates the horizontal scanlines visual effect, scales up the emulated screen resolution 3 times (that is, a 320x200 screen is scaled up to 960x600), loads and launches the cartridge named ghostsngoblins:
$ caio c64 --scanlines h --scale 3 --cart /games/c64/ghostsngoblins.crt
The next command activates the advanced horizontal scanlines visual effect (note the captial H), in this mode the specified scale factor is doubled (that is, a 320x200 screen is scaled up to 1280x800), it loads and launches the cartridge named Simon's Basic:
$ caio c64 --scanlines H --scale 2 --cart /apps/c64/simons_basic.crt
The next command loads and run a PRG program:
$ caio c64 --scale 3 --prg /games/c64/rambo.prg
A PRG program is directly injected into RAM while the emulator is suspended,
this means that the previous command won't work with an advanced or big file
that is expected to overwrite memory areas not configured as RAM. In that
case configuration options unit8 or unit9 must be used as follows:
$ caio c64 --scale 3 --unit8 /games/c64
then, from basic:
LOAD "RAMBO",8,1
Cartridges and programs can be specified without using their specific command line options, in this case the format is auto-detected:
$ caio c64 --scale 3 /games/c64/ghostbusters.crt
NES (Nintendo Entertainment System)
$ caio nes --help
usage: nes <options> [<file>]
where <file> is the name of a program, cartridge or
snapshot to launch (the file format is auto-detected)
and <options> are:
 ...
NES (Nintendo Entertainment System) specific:
 --ntsc [yes|no]         Use the resolution of an old NTSC TV set
                         (default is yes)
 --swapj [yes|no]        Swap Joysticks (default is no)
 --button-up <bt>        Map the controller UP button to a gamepad button
                         (default is UP)
 --button-down <bt>      Map the controller DOWN button to a gamepad button
                         (default is DOWN)
 --button-left <bt>      Map the controller LEFT button to a gamepad button
                         (default is LEFT)
 --button-right <bt>     Map the controller RIGHT button to a gamepad button
                         (default is RIGHT)
 --button-a <bt>         Map the controller A button to a gamepad button
                         (default is A)
 --button-b <bt>         Map the controller B button to a gamepad button
                         (default is B)
 --button-select <bt>    Map the controller SELECT button to a gamepad button
                         (default is GUIDE)
 --button-start <bt>     Map the controller START button to a gamepad button
                         (default is START)
 where <bt> is one of:
 UP, DOWN, LEFT, RIGHT, FIRE, A, B, X, Y, START, BACK, GUIDE
NES Family BASIC keyboard layout:

The default key mappings is positional, with the exception of the following keys:
| NES Keyboard | PC Keyboard |
|---|---|
| STOP | BACKSLASH \ |
| CTR | TAB |
| ] | ALTGR ; |
| KANA | ALTGR ' |
| _ | ALTGR+SHIFT / |
| GRPH | Left CTRL |
| YEN | ` (GRAVE ACCENT) |
Both standard NES controller ports are supported. If the virtual joystick
is enabled it is connected to the first port. The second port is conencted
to an eventual gamepad. This default can be changed using the swapj
option or the ALT-J key combination.
The following command scales up the emulated screen resolution 3 times (that is, a 256x224 screen is scaled up to 768x672), loads and launches the cartridge named Super Mario Bros.
$ caio nes --scanlines n --scale 3 --cart /games/nes/super_mario_bros.nes
The next command activates the advanced horizontal scanlines visual effect (note the captial H), in this mode the specified scale factor is doubled (that is, a 256x224 screen is scaled up to 1024x896), loads and launches the cartridge named Castlevania:
$ caio nes --scanlines H --scale 2 --cart /games/nes/castlevania.nes
Sinclair ZX-80
$ caio zx80 --help
usage: zx80 <options> [<file>]
where <file> is the name of a program, cartridge or
snapshot to launch (the file format is auto-detected)
and <options> are:
 ...
Sinclair ZX80 specific:
 --ram16 [yes|no]        Attach a 16K RAM instead of the default 1K RAM
 --rom8 [yes|no]         Attach the 8K ROM instead of the default 4K ROM
 --rvideo [yes|no]       Reverse video output
 --cassdir <dir>         Set the basic save/load directory (default is ./)
 --prg <.o|.p>           Load a .o/.p file as soon as the basic is started
The Sinclair ZX-80 came with 4K ROM
and 1K RAM. Soon after its introduction several RAMPACKs appeared, these
extended the RAM up to 16K.
When the ZX-81 came out, its 8K ROM was also available for the ZX-80.
caio supports the original configuration, the 16K RAM extension and
the 8K ROM.
The default keyboard layout is positional and depends on the installed ROM:
4K ROM keyboard layout:

8K ROM keyboard layout:

The cassette interface is supported. It associates an emulated tape to a directory in the host filesystem so files contained there are considered part of a single big tape.
Cassette file formats .O (4K ROM) and .P (8K ROM) are supported. Audio files (WAV, PCM, etc.) are not supported.
The behaviour of BASIC commands LOAD and SAVE depend on the ROM being
used:
- 4K ROM: The filename is always set to
basic.oand it is located under the cassette directory. Because of this, aSAVEoperation overwrites any previously existingbasic.ofile. - 8K ROM: In the case of a
SAVEoperation, a file is created in the cassette directory using the name specified by the user. In the case of aLOADoperation, the content of all .p files present inside the cassette directory are concatenated into a continuous sequence of bytes emulating a real tape.
See the cassdir configuration option.
The prg configuration option can be used to automatically load a program as
soon the basic is started by-passing the slow cassette interface.
For example:
$ caio zx80 --scale 2 --ram16 --prg /games/zx80/ZX80.4K.ROM.Pacman.o
Programs can be specified without the --prg command line option, in this
case the format is auto-detected:
$ caio zx80 --scale 2 --ram16 --rom8 yes /games/zx80/ZX80.8K.ROM.Kong.o
The following site has not only good information about the internals of the machine but it is also the main site of really beautiful games that exploit the flicker-free technique: ZX Resource Centre.
Sinclair ZX-Spectrum 48K
$ caio zxspectrum --help
usage: zxspectrum <options> [<file>]
where <file> is the name of a program, cartridge or
snapshot to launch (the file format is auto-detected)
and <options> are:
...
Sinclair ZX-Spectrum 48K specific:
 --tape <fname|dir>      Set the input tape file (TAP) or directory
 --otape <fname|dir>     Set the output tape file (TAP) or directory
                         (default is ./)
 --fastload [yes|no]     Fast tape loading (default is no)
The default keyboard layout is positional:

The CAPS SHIFT key is mapped as SHIFT and the SYMBOL SHIFT key
is mapped as CTRL.
The ZX-Spectrum does not have native joystick ports. External devices from various vendors were used to add joystick support to this machine. One of the most common of these devices is the Kempston joystick interface which caio supports.
If the virtual joystick is enabled (vjoy configuration option), the
Kempston interface is automatically connected to it. If a gamepad is
detected and the virtual joystick is not enabled then the Kempston
interface is connected to it.
For more information refer to the Generic Configuration section.
The cassette interface is emulated and it supports the
TAP file format.
Audio files (WAV, PCM, etc.) are not supported.
The cassette interface can be specified as a file or as a directory
and there are two configuration options:
-
tape: Sets the input tape (LOAD)
If a directory is specified as input tape, the content of a number of TAP files found inside it are concatenated creating a big virtual TAP which is used as input tape. -
otape: Sets the output tape (SAVE)
If a directory is specified as output tape, any SAVE operation creates a new TAP file inside it.
If a file is specified as output tape, any SAVE operation appends data to it.
The following command specifies the file starquak.tap as input tape:
$ caio zxspectrum --fastload --tape /games/spectrum/starquak.tap
The fastload option is used to disable time emulation during cassette
load operations.
In order to load and run the program stored inside that tape, the command shown below must be entered from BASIC:
LOAD ""
The snap option can be used to load a snapshot file.
Supported formats are SNA
and Z80.
The following command launches the game called Jet Set Willy which is
embedded inside a snapshot:
$ caio zxspectrum --snap /games/spectrum/Jet.Set.Willy.z80
Snapshots can be specified without using the --snap command line option,
in this case the format of the snapshot file is auto-detected:
$ caio zxspectrum /games/spectrum/elite.z80
When a specific machine is launched (using one of the methods explained in the previous section) a new window appears running the specified emulated platform.
The following key combinations are accepted:
ALT-FToggle between windowed and fullscreen modes.PAUSEorALT-PToggle between pause and running modes.ALT-JSwap joysticks #1 and #2.ALT-KToggle the status of the emulated keyboard (active/inactive).ALT-VToggle the visibility of the info panel.ALT-LLoad a snapshot file (emulator previously saved state).ALT-SSave a snapshot file (emulator current state).ALT-SHIFT-STake a screenshot.CTRL-Con the terminal to enter the CPU monitor (if the monitor is not active the emulation is terminated).
Under macOS the command ⌘ key must be used instead of the ALT key.
The Info Panel is an informational panel containing widgets used to show
status information of emulated devices and to control some aspects of the
emulator (audio volume setting, pause, reset, etc.).
The Panel can be made visible/invisible clicking the mouse right button
or using the ALT-V key combination.
The default panel widgets that appear on the screen are (from right to left):
- Toggle Fullscreen mode
- Take screenshot
- Save a snapshot (save the emulator's current state)
- Load a snapshot (load a previously saved emulator state)
- Platform reset
- Suspend/Resume emulation
- Audio Volume control
- Enable/Disable keyboard
There are other widgets that depend on the specifc emulated platform, such as:
- Joystick status
- Disk drive status
- Cassette status

The panel above shows the Commodore 64 disk drive unit 8 active, disk drive unit 9 disabled, joystick port #1 enabled and connected to the virtual joystick, it is not swapped with joystick port #2 which is disabled.
Besides the Info Panel, there is a small status bar that appears when the state of one or more devices is changed (disk activity, tape activity, etc.).
This bar appears only when the Info Panel is not shown and its position on the screen can be configured by the user.

When the virtual joystick is enabled and the emulated platform supports one or more joystick ports, the virtual joystick is connected to the first port.
When a gamepad is detected and the virtual joystick is enabled and the emulated platform supports more than one joystick port, the virtual joystick is connected to the first port and the gamepad to the second.
Some platforms (such as the Commodore 64) share the internal keyboard matrix with joystick ports, this means that a virtual joystick sharing keys with the emulated keyboard can negatively interfere with it. Refer to the specific platform configuration section to learn more about the virutal joystick and possible issues with the keyboard.